
How to Read Bug Bite Images: Photos, Clues, and Next Steps
Learn how to evaluate bug bite images: what to photograph, which visual clues matter, and safe next steps if a bite looks unusual.
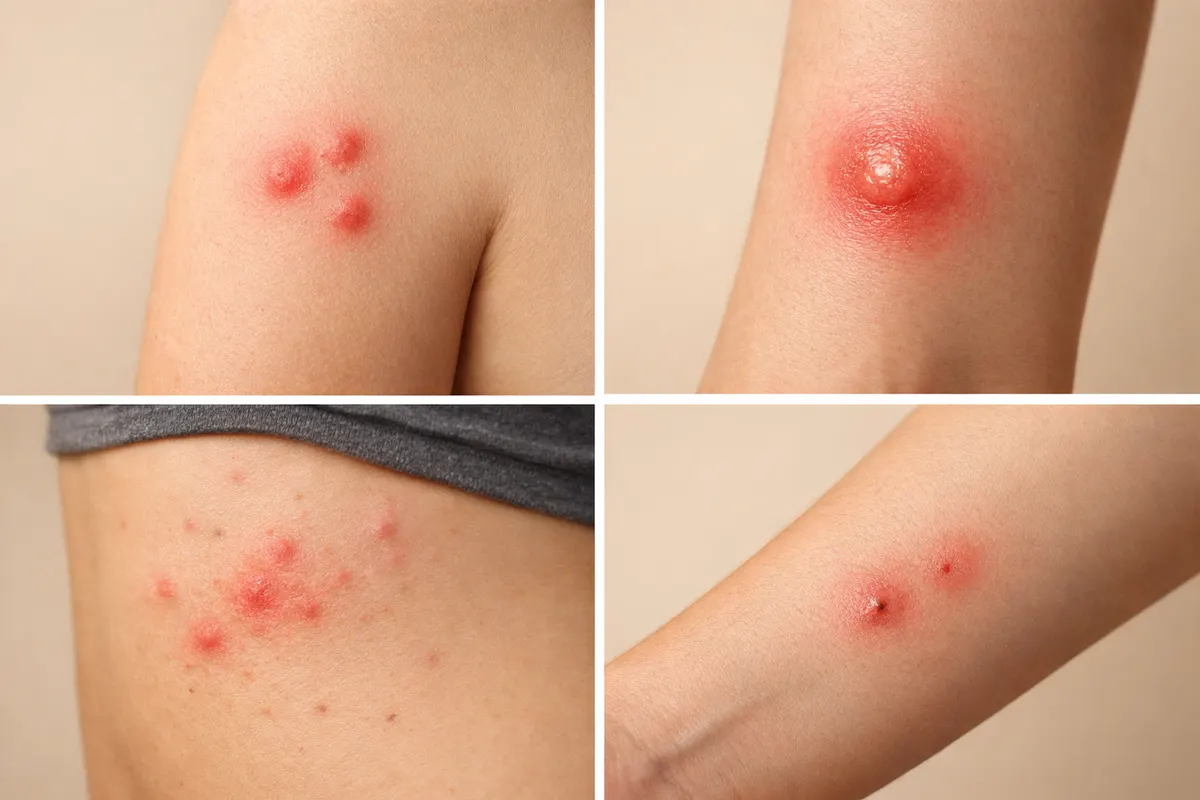
Quick answer: reading bug bite images
A clear photo can help you narrow possibilities, but it rarely gives a medically certain diagnosis. Bug bite images are most useful for documenting patterns, size, number, and environmental clues that point toward likely causes. With good photos and background details you can often distinguish between single-insect bites, cluster bites, and non-bite skin reactions.
When people search for “bug bite images” they usually want to know whether an insect bit them and whether the picture shows a dangerous condition. A photograph can suggest whether a bite looks like a tick attachment, a flea cluster, a bed bug line, or a mosquito single bite—but photos alone can’t confirm venom, infection, or a specific species with full certainty.
Use images as part of an evidence set: clear photos + timeline + symptoms + environment. If the image shows an attached tick, spreading redness, severe pain, or systemic symptoms (fever, nausea, difficulty breathing), treat the image as an urgent cue to seek medical attention rather than as proof of cause.
What bug bite images actually show
Photos capture three kinds of evidence: visible lesion characteristics on the skin, context around the lesion (nearby marks, clothing, bedding), and scale or size when a reference object is present. Each of these elements contributes to what the image can and cannot tell you. For example, a round red bump with a central punctum might be a mosquito bite, a spider bite, or a reaction to something else; context helps narrow that down.
A high-quality image shows color, texture, borders, and any central features (punctum, blister, necrosis). It will also show whether marks form a line, cluster, or single point. These patterns are often the strongest visual clues: clustered small bites favor fleas, linear series can suggest bed bugs, and one larger swollen lesion might reflect a solitary mosquito or spider bite—again, context matters.
Beyond the lesion itself, images that include clothing, bedding, or the location where the bite likely happened give important clues. A photo of welts on the lower legs amid dog fur in the room suggests a flea problem; multiple bites in a straight line on exposed skin after sleeping suggests bed bugs. Capturing both the lesion and surroundings improves the image’s diagnostic value.
Key clues to spot in bug bite images
Certain visual details carry more weight than others when evaluating a bite photo. Look for number and arrangement (single, cluster, linear), the presence of a central punctum or attached organism, swelling and blistering, color changes (including concentric rings), and signs of secondary infection like pus or spreading redness. Note each of these clearly in your observations.
Contextual clues visible in images are equally important. A scale object (coin, ruler), visible clothing, location on the body (lower legs, ankles, torso), and any nearby signs of insect activity (fecal specks on bedding, shed skins) should be photographed when safe to do so. These contextual items transform an isolated photo into a useful diagnostic piece.
Timing and progression are a diagnostic pair: a fresh bite photographed immediately looks different from the same lesion after 48 hours. If you can take sequential photos showing how the lesion changes, those images often tell more than a single snapshot. When possible, include a short note with each photo describing onset time and any new symptoms.
- Number & pattern: single vs. clustered vs. linear (e.g., flea clusters, bed-bug lines).
- Central feature: punctum, attached tick, blister, or visible stinger.
- Size & scale: include a coin or ruler so diameter is clear.
- Color & borders: uniform redness vs. target/concentric rings.
- Progression: photos at 0, 24, and 48 hours show important changes.
- Context: bedding, pet fur, clothing, outdoor site visible in shots.
Step-by-step: document and evaluate bug bite images
Start with safety. If you see an attached tick, increasing redness, severe swelling, spreading streaks, difficulty breathing, faintness, or fever, stop photographing and seek medical care immediately. For non-urgent cases, a simple, consistent photo routine produces the most useful images for later review by a clinician or an identification tool.
Take multiple photos from different distances: one close-up for lesion detail, one mid-range showing the lesion plus surrounding skin, and one wide shot that includes location context (bedding, shoes, outdoor surface). Always include a size reference—coin, ruler, or a reliable object—placed beside the lesion but not pressing it. Natural light or diffuse indoor light reduces color distortion.
Record the timeline and symptoms in a note to go with the images: exact time noticed, any known bites in the same area earlier that day, recent travel, outdoor activities, presence of pets, and whether you slept somewhere new. This metadata turns a photo into a usable case file and helps separate insect bites from allergic or contact reactions.
After collecting photos and notes, compare the evidence to common patterns: single large swollen bump (mosquito, solitary spider reaction), small clustered itchy points on lower legs (fleas), multiple evenly spaced bites along a line or strip (bed bugs), attached insect visible (tick). Use this comparison to decide whether to self-manage (cool compress, antihistamine, topical care), pursue pest inspection, or consult a clinician.
If you want a guided checklist that walks through the same photo-clue logic and suggested next steps, the site’s Bug Bite Identification page offers a structured flow for the visual clues and when to escalate to care or pest control.
- Step 1 — Safety check: urgent signs = seek immediate care.
- Step 2 — Photograph: close, mid, and wide shots + size reference.
- Step 3 — Log: time, symptoms, recent activities, pets, sleep.
- Step 4 — Compare: match pattern to common bite clusters or single bites.
- Step 5 — Act: self-care, pest inspection, or medical evaluation as indicated.
Examples: common bug bite image scenarios
Example 1 — Flea bites on lower legs: Images typically show many small (2–4 mm) red dots clustered around ankles and lower calves. They are often intensely itchy, in no strict linear order, and appear after contact with pets or in areas with animal sleeping spots. A photo that includes a sock line, pet bedding, or carpeting helps point toward fleas rather than bed bugs.
Example 2 — Bed bug line or cluster: Typical photos show several small red marks in a row (a ‘breakfast, lunch, dinner’ pattern) or grouped along exposed skin that was against a mattress. Mid-range shots that include bedding seams, mattress tags, or a nightstand help support the visual diagnosis. Bed bug bites often appear after a period of sleep and may be missed until morning.
Example 3 — Tick bite with attached tick: A close-up showing the attached tick is the most definitive photo evidence you can capture. Include a mid-range shot so location on the body is visible. If you remove the tick, preserve it in a sealed container if you plan to share it with medical personnel. Photograph the bite site prior to removal if possible, and note when removal occurred.
Example 4 — Mosquito or solitary insect bite: These usually present as a single, well-circumscribed, raised, itchy bump with a small central punctum. Photos will often show localized swelling without multiple adjacent lesions. Context such as being outdoors at dawn/dusk or not sleeping in infested bedding supports this interpretation.
Example 5 — Non-bite lookalikes (brief): Photos of contact dermatitis, allergic reactions, or superficial cellulitis can be mistaken for bites. Contact rashes are often more widespread with ill-defined borders; infections may show spreading redness and heat. If an image shows diffuse redness, warmth, or systemic signs, prioritize medical evaluation.
- Flea bites: clustered small dots, often around ankles; include pet context.
- Bed bugs: linear clusters or repeated lesions after sleep; include bedding.
- Ticks: attached insect visible—photograph before removal if safe.
- Mosquito: single, isolated raised bump with pinpoint center.
- Lookalikes: contact dermatitis and infection require different actions.
Limitations: uncertainty in bug bite images
Photos rarely provide absolute identification. Many skin findings share similar visual features—redness, swelling, a central dot—and different processes (bites, allergic reactions, infections) can look alike. That’s why image-based interpretation should be presented as a probability or a set of likely causes, not a definitive species-level ID.
Lighting, camera quality, skin tone, and timing all affect what a photo reveals. A swollen lesion photographed at peak inflammation will look different from the same lesion after healing begins; poor lighting can obscure a punctum; and close-up photos without scale make size-based assessments unreliable. These factors reduce confidence in any image-based conclusion.
High-confidence outcomes from photos occur when there are distinctive visual features (e.g., an attached tick, visible stinger, or a very characteristic cluster pattern) combined with supporting context (location, recent exposures). Partial-confidence outcomes include likely categories (flea vs. bed bug vs. mosquito). Low-confidence outcomes are single photos with no context or photos that resemble allergic/dermatological conditions.
When to verify with a professional: if a photo shows an attached tick, spreading redness, increasing pain, fever, or signs of infection, seek clinical evaluation. For pest confirmation (bed bugs, fleas), a home inspection or pest professional’s visit may be required—photos can guide that visit but often cannot substitute for direct inspection. If you share images with a clinician or pest professional, include the timeline and contextual notes to increase the utility of the photo set.
- High confidence: distinct attached organism or unmistakable pattern + context.
- Partial confidence: pattern matches common categories but lacks unique signs.
- Low confidence: single, context-free photo or a lesion resembling non-bite rashes.
- Verify with a clinician for systemic symptoms or worsening signs, and with a pest professional for infestations.
Related guides
Want a fast first pass on your photos?
After you’ve photographed and documented the bite using the steps above, consider a first-pass review with the Bug Bite Identifier tool on Bug Identifier. It’s designed to help you compare visual clues and next-step options quickly—use it as one part of your decision process, alongside symptom checks and professional care when needed: https://bug-identifier.app/tools/bug-bite-identifier
Take the next step →Frequently asked questions
Can I identify a bug from a single bite image?
A single bite image can suggest possibilities but rarely confirms species. Photos can indicate pattern (single vs. cluster), presence of a punctum, or an attached tick, which narrows causes. However, lookalike skin reactions and photo limitations mean a single image should be combined with symptom timing, activity history, and environment before concluding. Consider follow-up photos and notes for higher confidence.
What’s the best way to photograph a suspicious bite?
Take three photos: a close-up of the lesion for detail, a mid-range shot showing surrounding skin, and a wide shot that includes context (bedding, clothing, or the site). Use natural light, include a size reference like a coin or ruler, and avoid pressing or distorting the area. Add a short note with time noticed, recent outdoor or pet contact, and any symptoms to accompany the images.
When should I see a doctor instead of relying on images?
Seek medical care promptly if you have an attached tick, rapidly spreading redness, severe swelling, intense pain, fever, dizziness, difficulty breathing, or signs of infection like pus and warmth. For mild, localized itchiness without systemic signs, images plus self-care may suffice for initial steps, but worsening or persistent symptoms warrant clinical evaluation.
Can images tell me if I have bed bugs or fleas in my home?
Images of bites can suggest bed bugs or fleas—bed bug bites commonly appear in linear clusters after sleep, while flea bites cluster near ankles and lower legs. However, bite photos alone can’t confirm an infestation. Photographs of the environment (mattress seams, fecal specks, shed skins, pet fur) combined with physical inspection or a pest professional’s evaluation provide confirmation.