Stink Bug Identification: Shield Shape, Colors, and Lookalikes
A practical guide to stink bug identification: which visible traits matter, common lookalikes, and safe next steps before you rely on one photo.
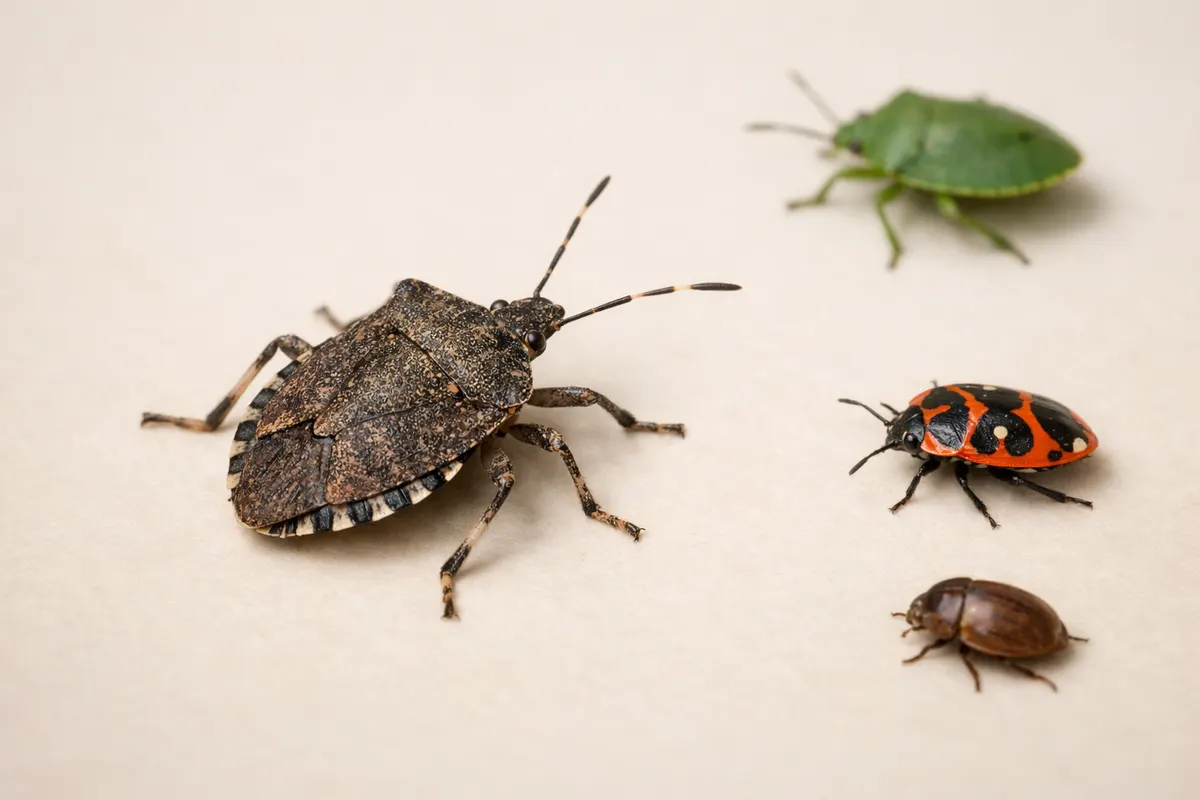
Quick answer for stink bug identification
Stink bug identification is best approached as a checklist, not a single flash judgment from one photo. The strongest visual signals are body shape (the classic shield or pentagonal outline), the pattern of the pronotum and scutellum, and the arrangement of legs and antenna segments. Those traits usually survive common photo problems like uneven lighting or partial obstructions and narrow the field to a handful of genera.
A single color or a blurry close-up can mislead: many lookalikes share a brown, green, or mottled tone. Context matters too — where and when you found the insect, its size relative to a familiar object, and whether it was alive or dead all change how to weigh visual clues. Treat a photo-based ID as a working hypothesis, not a definitive label.
If you need a clear next step after observing clues, capture three steady photos (dorsal, head-on, and side), note location and date, and compare those pictures to trusted references. Use those checklist notes as the starting point if you run a quick automated scan with a tool or consult a field guide.
- Most reliable immediate clues: overall shield shape, scutellum size, antenna segmentation, and leg posture.
- Always note context: habitat, plant host, activity (resting, feeding), and size reference.
- Don't rely on color alone — preserve multiple views before concluding.
stink bug identification clues to check first
Begin with proportions. The shield or pentagonal outline is the single most consistent field clue for stink bug identification. Look at the width of the body across the shoulders, the taper toward the head, and whether the margins are smooth or toothed. Even in poor lighting, the silhouette is often visible and rules out many beetles and true bugs with different body plans.
Examine the scutellum (the triangular plate behind the pronotum). In many stink bug groups the scutellum is large and extends well toward the rear; in others it is small. The relative size and texture of the scutellum help separate Pentatomidae (typical stink bugs) from similar Hemiptera families.
Antennae have diagnostic value. Count visible antennal segments in a clear photo: many stink bugs have five visible segments with a contrasting terminal band or notch. The presence of distinct light/dark banding or a blunt terminal segment can point to particular genera. If you can see the base of the antenna near the head, note its stoutness and whether segments are flattened or cylindrical.
Leg and tarsal detail supports an ID. Tarsal formula and the presence of small spines or a particular posture (legs tucked under the body versus splayed) are useful when scale and focus allow. Even the position of the legs when the insect is at rest—vertical versus spread—can exclude beetles and other lookalikes.
Texture and edged margins matter. Look for punctures, granular texture, or a glossy versus matte surface. Many lookalikes lack the slightly leathery, often pebbled dorsal surface of stink bugs. Also check the lateral margin for serrations or pale spots; these small traits are surprisingly durable clues in phone photos.
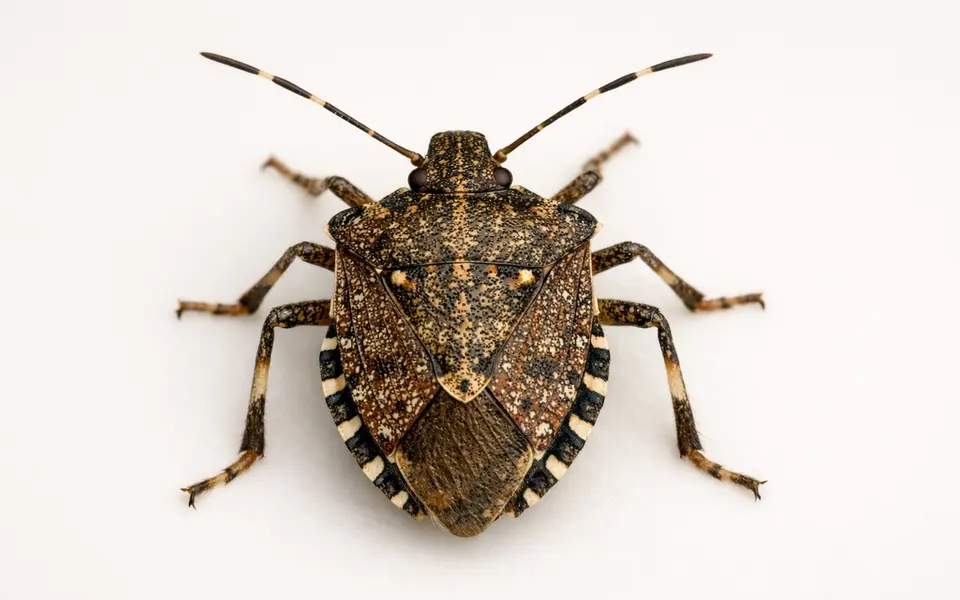
- Silhouette: shield/pentagonal outline and taper toward head.
- Scutellum size and shape: large-triangle vs. small plate.
- Antennae: count segments, note banding and shape.
- Leg posture and visible tarsal segments.
- Dorsal texture and lateral margin features (serrations, pale spots).
Weak signals
Color is the most commonly misused trait in stink bug identification. Many species vary by age, diet, or season; a nymph can be drastically different from an adult. Lighting, camera white balance, and post-processing also change perceived hue. Use color as a supporting note, not as a primary determiner.
One-angle photos and heavy glare produce misleading reading of shape and surface texture. A specular highlight can hide a scutellum or make margins look smooth when they are serrated. Always try for at least two viewing angles: dorsal (top), and one side or frontal image.
Scale without context is a weak signal. A bug that looks 'large' in a photo might be tiny if the camera is close. Include a familiar object or a ruler in at least one photo. Size influences the likely species list because many groups have characteristic adult size ranges.
Behavioral clues captured poorly in still images—like emitting odor, flying, or feeding posture—are unreliable from a single photo. Note whether the specimen was alive or dead and any observed behavior in your notes to help later verification.
- Color alone is unreliable — use it with texture and shape.
- Avoid conclusions from a single glared or extreme close-up image.
- Photos without a size reference make scale-based IDs risky.
- Behavior recorded in one still image should be noted but not used as proof.
Comparison workflow
An effective workflow combines multiple independent clues to build confidence. Start by listing three to five candidate families or genera suggested by silhouette and scutellum size. Then seek confirming clues: antenna banding, leg details, and dorsal texture. Work from broad to narrow—family-level shape first, then genus-level leg and antenna marks—and only then treat color or pattern as confirmatory.
Use a side-by-side comparison approach: place your best photos next to vetted reference images that emphasize the same trait. If a reference shows antenna banding and your photo does not, mark that trait as unresolved rather than a mismatch. Keep a short notes column—location, plant host, size—that can eliminate candidates quickly.
When two candidates remain, look for micro-traits. These include the number and position of lateral scent gland openings, the shape of the pronotal collar, and fine serration along the anterior margin. A magnified, focused shot of the head and pronotum often resolves these decisions. If your camera can capture macro detail or you can safely use a macro lens attachment, those shots are the highest-value additions.
If uncertainty remains, treat the result as a research note. Record the strongest three clues and how they point to each candidate. That record helps automated tools and human experts interpret your submission later, and it stops premature labels from being treated as facts.
- Step 1: Use silhouette and scutellum to pick candidate groups.
- Step 2: Confirm with antenna banding, leg details, and texture.
- Step 3: Compare your photos directly with vetted references.
- Step 4: Capture macro shots of head/pronotum for micro-traits.
- Step 5: Log the top three clues and your confidence level as a research note.
App workflow
After you collect clear photos and a short clue list, use the app as a structured next step. Treat the app's result as a probabilistic suggestion, not a final ruling. Enter the most reliable observations you recorded—shape, scutellum size, number of antennal segments, and size reference—so the tool can weigh those traits along with image features.
If the app returns multiple likely matches, revisit your photos and the comparison workflow. Use the app's suggestions to find specific reference images and then re-check micro-traits like pronotal serration or leg tarsal detail. The combination of human notes and an automated pass often converges on the right group more quickly than either alone.
When results remain uncertain, keep your entry as a research note. Save the top suggested matches, the three strongest clues you observed, and location/time metadata. This information makes follow-up easier if you later consult a regional expert, pest control person, or entomology forum. Remember the app is a tool to accelerate identification, not to override missing or contradictory visual evidence.
- Upload only to the app after you’ve taken dorsal, side, and head photos and noted size and context.
- Provide checklist notes to the app to improve suggestion accuracy.
- Treat top app matches as candidates—re-check micro-traits against references.
- Save your photos, clues, and confidence level as research notes for later review.
Related guides
Try Bug Identifier after your checklist
When you’ve photographed the bug from multiple angles and written down the strongest clues, try Bug Identifier as a next step to suggest likely matches. Add your notes (shape, scutellum, antenna details, size and location) alongside the photos so the app can weigh them. Treat the app’s suggestions as candidates to confirm with reference photos or an expert, and save each scan as a research note so you can track changes or follow up later.

Frequently asked questions
What stink bug identification examples should I compare to my photo?
Start with regional adult photos that emphasize the same view you have: dorsal, head-on, or side. Compare the silhouette, scutellum size, and antenna banding first. Good examples to match against include common local species pictures that show clear margin serrations, scutellum proportions, and any distinctive white or dark antennal bands. If you’re in a temperate planting zone, also look for nymph series images from the same region, since juvenile stink bugs can look quite different from adults.
How do I tell a stink bug from a similar beetle when my phone photo is blurry?
Focus on outline and leg posture. Beetles usually have hardened wing covers (elytra) with a clear seam and often a more rounded body shape, while stink bugs have a flattened, shield-like silhouette and a visible scutellum triangle. Even in blurry photos you can often see whether the bug’s rear has a triangular scutellum or the distinct elytral seam of a beetle. If you can’t decide, take a slightly more distant, steadier shot that captures the whole insect against a plain background to reveal overall shape.
Can I identify species-level stink bug identity from one clear photo?
Rarely. One clear photo can get you to a likely genus or species group when it captures several key traits—shield outline, scutellum, antennal banding, and dorsal texture—but many species require micro-details like scent gland placement, genital characters, or consistent host-plant association to confirm. Treat a single-photo species label as provisional and look for confirming images or small-dissection traits if an exact species ID is essential.
What immediate steps should I take if the bug might be a pest?
First, document with multiple clear photos (dorsal, side, head), note the plant or structure affected, and estimate size with a scale reference. Use an app or reference checklist to narrow candidates, but avoid chemical treatment until you’re sure of the pest identity. For household concerns, isolate the specimen in a sealed container for inspection; for crops, monitor nearby plants and document damage progression. If a quick management decision is necessary, consult a regional extension service or pest professional with your photo and the clues you recorded.